In my previous post, we were introduced to CSS and given a few points of consideration to help visualize CSS on a very basic level. This follow up article will expound slightly on those ideas and start diving into the visualization process.
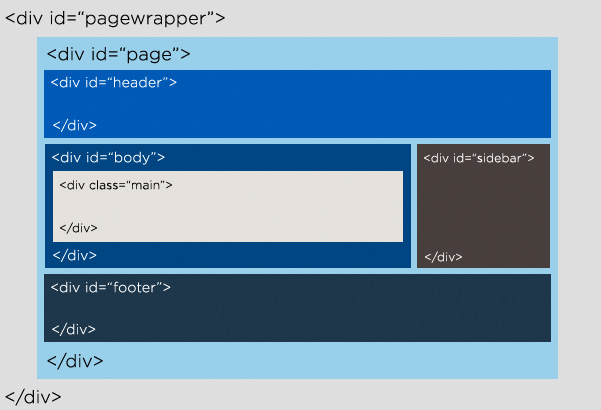
Specifically, we looked at this box-model diagram of CSS:
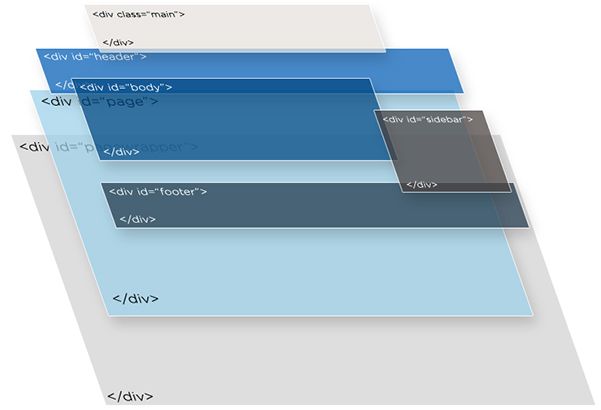
At this point, it’s important to note that, while the image above is completely valid and true, we should actually be thinking of CSS in the following way:
We will expound more on this idea later, but in effect, when you create a new “div” you are essentially creating a new “layer” as the diagram shows. For designers, we should be able to relate to this because Photoshop, Illustrator and InDesign all have layering capabilities. We can actively select layers, fill them with color, text and images, etc. and move them up and down so that we control what is on top and what is on bottom.
We also know that when we print, most often it is one ink layering on top of the other. For a process image, various screen patterns made up of cyan, magenta, yellow and black layering on top of one another create the full color image. The same is true for CSS in principle.
What is really cool is that once we truly grasp this concept, we can begin literally layering transparent .png files one on top of the other in our web pages. The only caveat to this is that the .png format isn’t completely supported at the time of this article ***cough – Internet Explorer (the bane of my existence)***. There are workarounds, however, and hopefully later releases of this browser will support .png files; aka “pings”.
A Note on Layering and Nesting
The primary difference between layering in CSS and layering in Photoshop, for example, is the concept of “nesting”. In CSS, we have to remember that although one div is layered on top of another, it is done so relative to its parent element.
In the diagram above, although we can clearly see div class=”main” layered on top of everything else, we have to remember that in the HTML markup, “main” will still be “nested” within “body”:

Thus, any CSS rules you have applied to “body” will also apply to “main” – unless you override them. We will discuss more about how to create CSS rules and their application, but by definition, CSS rules you create “cascade” down to the next element – or elements “nested” within them. These “nested” elements are also known as “children”. So, in effect we have a “parent/child” relationship with CSS and nested divs.
In my next article, we will specifically cover visualization tools so we can see this in action. If you want to get ahead, go ahead and start by downloading Firefox and the downloading and installing the Firebug Add-On.
Enjoy!


